Call Transfer Application Migration from Plivo XML to FlexML
If you have read the Migrating from Plivo to CarrierX Quick Start, you could see that Plivo XML and FlexML are not too much different. Both offer a special syntax to provide instructions, and all you need is to change the representation of these instructions in your code.
But when it comes to a real-case migration from Plivo to CarrierX, users might meet some difficulties.
Let’s see such a migration in details and learn how to solve the issues that arise so that your migrated application worked with CarrierX flawlessly.
Getting Application Source Code
We take the Call Transfer application from Plivo as an example. This sample application answers the call and redirects the calling party to another phone number. It can additionally print information about the redirected call status to the console. You can download the application source code at GitHub.
The application contains a single call_transfer.py file which we are going to modify.
All the routes used to send requests and responses for our application are in this file.
Modifying Application Routes
Let’s take a closer look at each of the routes in the file.
The application code file contains two routes:
- call_transfer route
- connect route
We will additionally create the third route to print the information about the call status. We will take the code for this route from another Plivo application: Dial Status Reporting. You can download the application source code at GitHub as well:
- dial_status route
We will go step by step through each of the routes, check what each of them contains, and learn how to modify these routes to migrate their code to FlexML.
1. call_transfer Route
The first route we are going to change is call_transfer. The application uses it to greet its users, announce that it is going to transfer the call to another phone number, and redirect to the next set of instructions.
We modify the call_transfer route like this:
-
The call_transfer route uses the
ResponseElement()class to build the Plivo XML response to the call. In FlexML we do not need it, so we can remove this line. -
We remove the absolute URL path from the
RedirectElementelement, as FlexML allows using the relative path. This will be more useful if we decide to test our application locally. We also remove theresponse.add()function which builds the response. -
Finally, we
returnthe FlexML formatted string instead of the Plivo XMLResponse(). In it, we replace Plivo XMLSpeakelement with the corresponding CarrierX FlexMLSayverb.
Plivo XML Python Code
@app.route("/call_transfer/", methods=["GET", "POST"])
def call_transfer():
response = plivoxml.ResponseElement()
response.add(
plivoxml.SpeakElement("Please wait while you call is being transferred.")
)
response.add(plivoxml.RedirectElement("http://foo.com/connect/"))
return Response(response.to_string(), mimetype="application/xml")
Corresponding FlexML Python Syntax
@app.route("/", methods=["GET", "POST"])
def call_transfer():
return '''
<Response>
<Say>Please wait while you call is being transferred</Say>
<Redirect>/connect/</Redirect>
</Response>'''
2. connect Route
The connect route transfers the call to another phone number and sends the data about the call to the dial_status route.
Thus, we change this route the following way:
-
The connect route uses the
ResponseElement()class to build the Plivo XML response to the call. In FlexML we do not need it, so we can remove this line. -
We remove the absolute URL path from the
actionattribute of theDialelement, as FlexML allows using the relative path. This will be more useful if we decide to test our application locally. We also remove theresponse.add()function which builds the response. -
Finally, we
returnthe FlexML formatted string instead of the Plivo XMLResponse(). We do not use theredirectattribute with FlexMLDialas it works without it. We also replace Plivo XMLSpeakelement with the corresponding CarrierX FlexMLSayverb.
Plivo XML Python Code
@app.route("/connect/", methods=['GET', 'POST'])
def connect():
response = plivoxml.ResponseElement()
response.add(plivoxml.SpeakElement("Connecting your call"))
response.add(
plivoxml.DialElement(
action="http://foo.com/dial_status/", method="GET", redirect=True
).add(plivoxml.NumberElement("15671234567"))
)
return Response(response.to_string(), mimetype="application/xml")
Corresponding FlexML Python Syntax
@app.route("/connect/", methods=['GET', 'POST'])
def connect():
return '''
<Response>
<Say>Connecting your call</Say>
<Dial action="/dial_status/" method="GET">
<Number>15623499000</Number>
</Dial>
</Response>'''
3. dial_status Route
The dial_status route displays the status information about the call. In Plivo application it displays the call status and the UUIDs of the incoming and outgoing legs (LegA and LegB). In our application we will display the call status and the phone numbers from LegA and LegB.
Thus, we change this route the following way:
-
First, we need to replace the names of the fields returned by the callback. We are going to change them the following way:
DialStatusbecomesDialCallStatus,DialALegUUIDwill be replaced withFromandDialBLegUUIDwithTo. -
After that we update the console output to reflect the above changes.
Plivo XML Python Code
@app.route('/dial_status/', methods=['GET','POST'])
def dial_status():
status = request.args.get('DialStatus')
aleg = request.args.get('DialALegUUID')
bleg = request.args.get('DialBLegUUID')
print ("Status : %s, ALeg Uuid : %s, BLeg Uuid : %s" % (status,aleg,bleg))
return "Dial status reported"
Corresponding FlexML Python Syntax
@app.route("/dial_status/", methods=['GET', 'POST'])
def dial_status():
status = request.args.get('DialCallStatus')
aleg = request.args.get('From')
bleg = request.args.get('To')
print ("Status : %s, From : %s, To : %s" % (status,aleg,bleg))
return "Dial status reported"
Now that we modified all the routes, we can safely remove the Plivo library import declaration from the beginning of the call_transfer.py file:
from plivo import plivoxml
from flask import Flask, request
app = Flask(__name__)
@app.route("/", methods=["GET", "POST"])
def call_transfer():
return '''
<Response>
<Say>Please wait while you call is being transferred</Say>
<Redirect>/connect/</Redirect>
</Response>'''
@app.route("/connect/", methods=['GET', 'POST'])
def connect():
return '''
<Response>
<Say>Connecting your call.</Say>
<Dial action="/dial_status/" method="GET">
<Number>15623499000</Number>
</Dial>
</Response>'''
@app.route("/dial_status/", methods=['GET', 'POST'])
def dial_status():
status = request.args.get('DialCallStatus')
aleg = request.args.get('From')
bleg = request.args.get('To')
print ("Status : %s, From : %s, To : %s" % (status,aleg,bleg))
return "Dial status reported"
if __name__ == "__main__":
app.run(host='0.0.0.0', debug=True)
Finishing Migration
Now let’s test our application! You can run your local Flask server through terminal using the following command that will serve the created application to the incoming requests.
FLASK_APP=call_transfer.py flask run
Now your application is running, but it is not visible to the outside world. We need to expose the localhost route publicly over the Internet so that your endpoint could access and load the FlexML instructions. To do this, we can use the free ngrok tool. If you choose to use ngrok, follow the instructions on their website to download it. Alternatively, you may expose the URL any other way you choose.
Once your Flask server is running, your terminal will list the port it is running on. Expose this port by running the following command through terminal. Make sure to replace 5000 (which is the Flask default port) with the port that your Flask server is running on.
./ngrok http 5000
When ngrok is run successfully, it will open a new terminal tab that will show you the http and https URLs that make the application publicly available over the Internet.
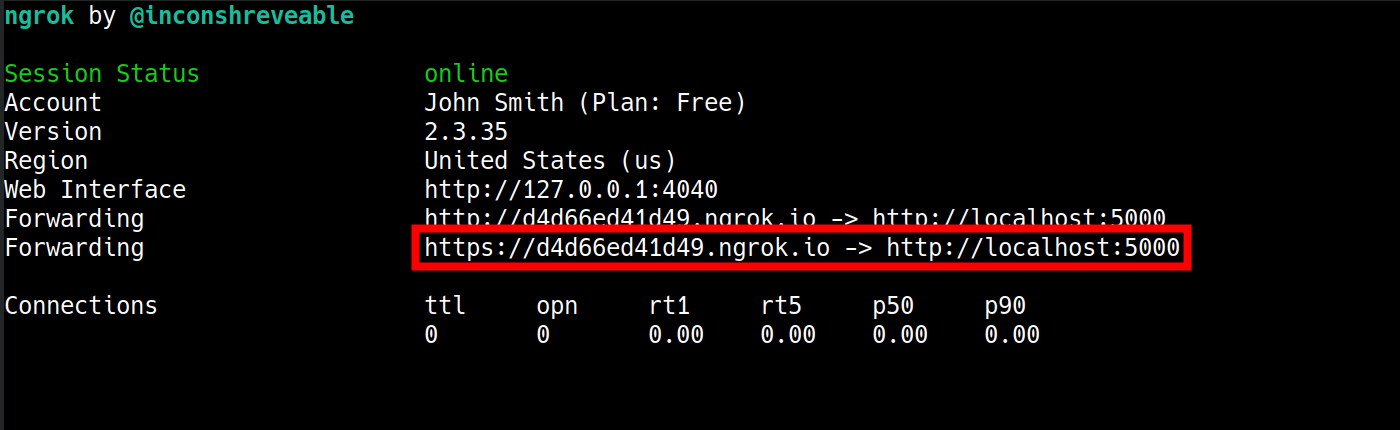
Add the https ngrok link (in our sample it is https://d4d66ed41d49.ngrok.io/call_transfer, as we chose call_transfer to be our default route) to either a FlexML endpoint or a DID associated with a FlexML endpoint. Refer to the FlexML Endpoint quick start guide to learn how.
After that, call the associated DID to check how the application works.
Further Reading
You have successfully migrated the Call Transfer application from Plivo XML to FlexML!
Refer to the following pages to learn more about FlexML verbs and how to use them, and about ways to set up a FlexML endpoint:
Use our Migrating from Plivo XML to CarrierX Quick Start to learn more about other difficulties you can meet while migrating from Plivo XML to CarrierX and the ways to solve these issues.
Read other instructions on real-case migrations from Plivo XML to CarrierX here:
Refer to our other quick start guides for instructions on how to work with CarrierX: