FlexML AMD Application
AMD stands for ‘Answering Machine Detection’. In this guide, you will learn how to create a FlexML application powered with the Amd verb. This might be useful if you want to protect your destination from spammers who use automated calls.
I. Plan Application Structure
Before we start writing our application, we need to plan how the application is going to behave and respond to different user actions. To do that, we suggest the following algorithm that describes the application behavior:
- The caller calls the phone number that is associated with our FlexML application.
- The application greets the caller and waits for some actions.
- When the caller speaks, the application will try to determine if the caller is human or machine and, depending on the result, will redirect the caller to the correct destination:
- If the caller is human, the application will redirect the user to the destination number.
- If the caller is machine, the application hangs up.
- If the application cannot decide whether the caller is human or machine, it will consider the caller human and will redirect to the destination number.
This application algorithm can be described with the following block diagram:

FlexML has verbs for all the above actions, so we can proceed to building the application.
II. Build Application
In this section, we will build a FlexML application using Python to serve our route.
- Register with CarrierX to access the CarrierX portal.
- Rent a phone number from CarrierX to associate it with the created FlexML endpoint later.
- Have Python installed on your local machine. There are Python versions available for MS Windows, Mac OS X, various Linux distributions, and some other platforms.
- Add Flask micro web framework to your Python installation. It will serve as a simple web server and will run our FlexML application.
Step 1: Create First Route
Let’s start our application with the default route that will accept the call and make some response. The flexml_amd.py Python code file will hold our default route, and all the next routes we create for the sake of simplicity.
Import Flask at the beginning of the file, and initiate the Flask application with the app = Flask(__name__) command.
We will call the default route hello. It will be available at the http://example.com/hello address of our application, and will only work if the POST is applied when addressing it.
To respond to the incoming call, the Say FlexML verb is used. It will pronounce the words stored inside the <Say></Say> tags, for example:
<Say>Welcome to CarrierX FlexML application. Please announce yourself</Say>
For the Say to work correctly, we need to place it inside the Response tag, like this:
<Response>
    <Say>Welcome to CarrierX FlexML application. Please announce yourself</Say>
</Response>
The Pause FlexML verb allows us to add some time before the application responds to the call, so that the voice could be correctly loaded even on slower connections. The length of the pause is set in seconds, and three seconds is alright for most cases.
The resulting code for our hello route will look the following way:
from flask import Flask

app = Flask(__name__)

@app.route('/hello', methods=['POST'])
def hello():
    return '''<Response>
                  <Pause length="3"/>
                  <Say>Welcome to CarrierX FlexML application. Please announce yourself</Say>
              </Response>'''
Step 2: Start Flask Server
Now let’s test the first lines of our application! You can run your local Flask server through terminal using the following command that will serve the created application to the incoming requests.
FLASK_APP=flexml_amd.py flask run
Now your application is running, but it is not visible to the outside world. We need to expose the localhost route publicly over the Internet so that your endpoint could access and load the FlexML instructions. To do this, we can use the free ngrok tool. If you choose to use ngrok, follow the instructions on their website to download it. Alternatively, you may expose the URL any other way you choose.
Once your Flask server is running, your terminal will list the port it is running on. Expose this port by running the following command through terminal. Make sure to replace 5000 (which is the Flask default port) with the port that your Flask server is running on.
./ngrok http 5000
When ngrok is run successfully, it will open a new terminal tab that will show you the http and https URLs that make the application publicly available over the Internet.
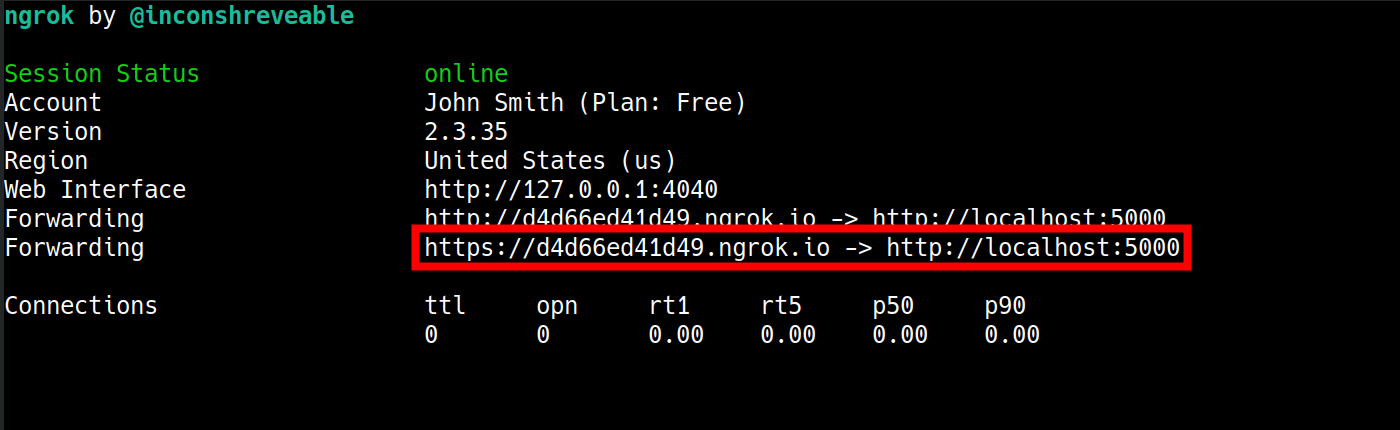
Add the https ngrok link (in our sample it is https://d4d66ed41d49.ngrok.io/hello, as we chose hello to be our default route) to either a FlexML endpoint or a DID associated with a FlexML endpoint. Refer to the FlexML Endpoint quick start guide to learn how.
Now we have an introductory route that greets the caller.
This logic can be described with the following block diagram:

The next step is to add the ability to our application to check if caller is human or machine.
Step 3: Check Caller
We will use the Amd FlexML verb to try and decide whether the caller is human or not. But before that, let’s write down some rules which these decisions will be based on.
-
We expect that the callers will introduce themselves or at least will say ‘Hello’. So, there should be a greeting, but it should be rather short, 2 seconds maximum. If the callers start their long speech without any introduction, they will be considered machine.
-
We also expect that the initial silence before the callers start to speak will not exceed 5 seconds. If the callers do not start their greeting for more than 5 seconds, they will be considered machine.
-
After the greeting is pronounced, there should be some short silence before the next words. If this silence is longer it is okay, but if the callers start speaking right after the greeting without any pause, they will be considered machine.
To match these rules, the following attributes of the Amd verb are used:
| Attribute | Description |
|---|---|
| greeting | The maximum length in milliseconds of a greeting. If this number of seconds is exceeded, the other party is determined to be machine. |
| initialSilence | The maximum duration of silence in milliseconds before the greeting will begin. If this value is exceeded, the other party is determined to be machine. |
| afterGreetingSilence | The length of silence in milliseconds after a greeting is detected. If this number of seconds is exceeded, then the other party is determined to be human. |
We will additionally use the totalAnalysisTime attribute, so that the whole analysis time included the initial silence, the greeting itself, the pause after the greeting and the next words.
This way, the code for the Amd verb should look like this:
<Amd initialSilence="5000" greeting="2000" afterGreetingSilence="500" totalAnalysisTime="8000" />
Let’s add it to the main route:
from flask import Flask

app = Flask(__name__)

@app.route('/hello', methods=['POST'])
def hello():
    return '''<Response>
                  <Pause length="3"/>
                  <Say>Welcome to CarrierX FlexML application. Please announce yourself</Say>
                  <Amd initialSilence="5000" greeting="2000" afterGreetingSilence="500" totalAnalysisTime="8000" />
              </Response>'''
Now the application logic can be described with the following block diagram:

Step 4: Parse Analysis Results
Once the analysis is made, the application must parse its results and either redirect the human caller to the correct destination or hang up on the machine caller.
Let’s add the amd route where we will parse the results and make a decision. For now, we will simply announce the route and do nothing else afterwards:
@app.route('/amd', methods=['POST'])
def amd():
For the call to be redirected to the new amd route, we add the action="/amd" and method="POST" attributes to the Amd verb. The response for the hello route will look like this:
<Response>
    <Pause length="3"/>
    <Say>Welcome to CarrierX FlexML application. Please announce yourself</Say>
    <Amd action="/amd" method="POST" initialSilence="5000" greeting="2000" afterGreetingSilence="500" totalAnalysisTime="8000" />
</Response>
At this stage, we have the following resulting code for our application:
from flask import Flask

app = Flask(__name__)

@app.route('/hello', methods=['POST'])
def hello():
    return '''<Response>
                  <Pause length="3"/>
                  <Say>Welcome to CarrierX FlexML application. Please announce yourself</Say>
                  <Amd action="/amd" method="POST" initialSilence="5000" greeting="2000" afterGreetingSilence="500" totalAnalysisTime="8000" />
              </Response>'''

@app.route('/amd', methods=['POST'])
def amd():
The hello route, once the Amd verb makes the decision based on the caller behavior, sends the following data to the amd route:
{
    "AccountSid": "",
    "AMDCause": "LONGGREETING-2000-2000",
    "AMDStatus": "MACHINE",
    "ApiVersion": "2.0",
    "CallSid": "4f0d84c72ff90967f58351cbe8364a77",
    "CallerName": "+19093189030",
    "Direction": "inbound",
    "From": "19093189030",
    "OriginalFrom": "+19093189030",
    "OriginalTo": "19093189029",
    "RequestUrl": "https://d4d66ed41d49.ngrok.io/hello",
    "To": "19093189029"
}
This part is of interest to us:
{
    "AMDCause": "LONGGREETING-2000-2000",
    "AMDStatus": "MACHINE"
}
This is the result of the Amd verb analysis and the reason for the decision, and in our example it considered the caller MACHINE for the reason of a too long greeting (it exceeded 2 seconds).
In case of the correct detection of a human caller, the response might look like this:
{
    "AccountSid": "",
    "AMDCause": "HUMAN-500-500",
    "AMDStatus": "HUMAN",
    "ApiVersion": "2.0",
    "CallSid": "4f0d84c72ff90967f58351cbe8364a77",
    "CallerName": "+19093189030",
    "Direction": "inbound",
    "From": "19093189030",
    "OriginalFrom": "+19093189030",
    "OriginalTo": "19093189029",
    "RequestUrl": "https://d4d66ed41d49.ngrok.io/hello",
    "To": "19093189029"
}
As this data is sent in a form of JSON, our application must get it and correctly retrieve the necessary AMDStatus value.
This is done with the request.get_json() method that is available in the Flask request module, which parses data as JSON.
Add the following lines to the amd route of the application:
data = request.get_json()
amd_status = data.get('AMDStatus','')
Here the data variable will be equal to all the JSON data received from the hello route, and amd_status will accept the AMDStatus value and be equal to MACHINE or HUMAN.
And now we can compare the received status with our expectations. The result should follow this logic:
- if
amd_statusequals toHUMANorNOTSURE, the application will redirect the caller to the destination (or call the destination number using the Dial FlexML verb, in our case). - if not, and
amd_statusequals toMACHINEorHANGUP, the application will hang up.
The final code of our application looks the following way:
from flask import Flask, request

app = Flask(__name__)

@app.route('/hello', methods=['POST'])
def hello():
    return '''<Response>
                  <Pause length="3"/>
                  <Say>Welcome to CarrierX FlexML application. Please announce yourself</Say>
                  <Amd action="/amd" method="POST" initialSilence="5000" greeting="2000" afterGreetingSilence="500" totalAnalysisTime="8000" />
              </Response>'''

@app.route('/amd', methods=['POST'])
def amd():
    data = request.get_json()
    amd_status = data.get('AMDStatus','')
    if amd_status == 'HUMAN' or amd_status == 'NOTSURE':
        return '''<Response>
                      <Say>Thank you! You will be now connected to the destination phone number</Say>
                      <Dial>
                          <Number>19093189031</Number>
                      </Dial>
                  </Response>'''
    else:
        return '''<Response>
                      <Hangup/>
                  </Response>'''
Run it, call the application, and try and say a greeting. Or try and break the rules we decided upon at step 3, and see the result.
III. Further Reading
You have created your FlexML application that uses the Amd verb analysis!
Refer to the following pages to learn more about FlexML verbs and how to use them, and about ways to set up a FlexML endpoint: