Using External Handlers
In this guide, you will learn how to assign external handlers to the trunk group you use.
External handlers allow you to create an application that will be used with all the calls that call into a trunk group. These handlers will accept requests and return a set of actions to perform.
This might be useful if you want to protect your destination from certain phone calls, for example, if you have a database with phone numbers from which you want to lock the calls and block the people from the trunk group associated with a single or multiple CarrierX phone numbers (blacklist these calls), or vice versa, with phone numbers which can be used to call into the trunk group (whitelist these calls).
I. Plan Application Structure
To implement the above call flow, we will run a web application that does a simple check against a calling database.
- If the call is from a phone that is not blacklisted, the application will return
[]to accept the call. -
Otherwise, if the call is from a phone that is blacklisted, the application will return the following response to drop the call:
[
    {
        "action": "reject",
        "operands": ["unavailable", "aniblock"]
    }
]
This application algorithm can be described with the following block diagram:

II. Build Application
In this section, we will build an application using Python to serve our route.
- Register with CarrierX to access the CarrierX portal.
- Rent a phone number from CarrierX.
- Configure an endpoint to route your calls to.
- Create a trunk group and associate the rented phone number with it.
- Have Python installed on your local machine. There are Python versions available for MS Windows, Mac OS X, various Linux distributions, and some other platforms.
- Add Flask micro web framework to your Python installation. It will serve as a simple web server and will run our application.
Step 1: Create Application Route
Let’s start our application with the default route that will handle the calls. We will use the external_handlers.py Python code file to hold our default route.
Import Flask at the beginning of the file, and initiate the Flask application with the app = Flask(__name__) command.
We will call the default route home. It will be available at the http://example.com/ address of our application, and will only work if the POST is applied when addressing it.
The route will contain the list of the phone numbers we want to block, we will store it in a Python list:
blacklisted_numbers = ["5162065613","5162065614","5162065615","5162065616"]
For the application to return some data (to be functional) we will add the return '[]' response to the route.
The resulting code for our home route will look the following way:
from flask import Flask, request

app = Flask(__name__)

@app.route('/', methods=['POST'])
def home():
    blacklisted_numbers = ["5162065613","5162065614","5162065615","5162065616"]
    return '[]'
This code will not actually do anything to a call, as it just specifies the list of phone numbers and returns [] so that the call continues without any changes.
To manipulate the phone numbers list, we need to set the appropriate logic.
Step 2: Get Incoming Phone Number
First, we need to get the phone number that is used to make the incoming call. When we set the external handlers, the trunk group will send the following data about the phone call to the handler:
{
    "Allow" : [
        "INVITE, ACK, CANCEL, OPTIONS, BYE, REFER, SUBSCRIBE, NOTIFY, INFO, PUBLISH, MESSAGE"
    ],
    "Call-ID" : [
        "243b35b872d5bb005af22dd9339e8149@10.1.10.190"
    ],
    "Contact" : [
        {
            "header_parameters" : {},
            "host" : "10.1.5.200:5060",
            "name" : "",
            "raw" : "<sip:15162065613@10.1.5.200:5060>",
            "uri_parameters" : {},
            "user" : "15162065613"
        }
    ],
    "Content-Length" : [
        "349"
    ],
    "Content-Type" : [
        "application/sdp"
    ],
    "CSeq" : [
        "103 INVITE"
    ],
    "Date" : [
        "Wed, 20 May 2020 08:46:17 GMT"
    ],
    "From" : [
        {
            "header_parameters" : {
                "tag" : "as69da6efa"
            },
            "host" : "10.1.10.190",
            "name" : "John Smith",
            "raw" : "\"John Smith\" <sip:15162065613@10.1.10.190>;tag=as69da6efa",
            "uri_parameters" : {},
            "user" : "15162065613"
        }
    ],
    "Max-Forwards" : [
        "69"
    ],
    "P-Charging-Vector" : [
        "icid-value=ab5fc4ee59;icid-generated-at=12.7.193.171"
    ],
    "Remote-Party-ID" : [
        {
            "header_parameters" : {
                "screen" : "no",
                "privacy" : "off",
                "party" : "calling"
            },
            "host" : "10.1.10.190",
            "name" : "John Smith",
            "raw" : "\"John Smith\" <sip:15162065613@10.1.10.190>;party=calling;privacy=off;screen=no",
            "uri_parameters" : {},
            "user" : "15162065613"
        }
    ],
    "Supported" : [
        "replaces, timer"
    ],
    "To" : [
        {
            "header_parameters" : {},
            "host" : "10.1.10.190:5060",
            "name" : "",
            "raw" : "<sip:19512623062@10.1.10.190:5060>",
            "uri_parameters" : {},
            "user" : "19512623062"
        }
    ],
    "User-Agent" : [
        "VirtualPBX"
    ]
}
This is quite a lot of data, and actually, there can be more information with some other fields. But what we really need from here is this part:
{
    "From" : [
        {
            "user" : "15162065613"
        }
    ]
}
This is the phone number from which the call is made. We need to extract this phone number from the incoming data and later compare it against the list of the phone numbers we want to blacklist.
As this data is sent in a form of JSON, our application must get it and correctly retrieve the necessary user value.
This is done with the request.get_json() method that is available in the Flask request module, which parses data as JSON.
Add the following line to the top part:
import json
and also these lines to the home route of the application:
data = request.get_json()
from_field = data.get('From','')
Here the data variable will be equal to all the JSON data received from the trunk group, and from_field will accept the data in the From value. It will be equal to a list of the values (as the From field contains an array inside it).
Let’s iterate through this list using the for loop:
for item in from_field:
    from_number = item['user'][-10:]
Here the from_number variable will be equal to the last ten digits of the user field of the JSON From data, and now we can proceed to checking if this value is one of the phone numbers from the black list or not.
Step 3: Check Blacklisted Phone Numbers
When we compare the received phone number with the black list, the result should follow this logic:
- if
from_numberequals to one of the blacklisted numbers, the application will hung up, or send therejectstatus to the caller. - if not, and
from_numberis not equal to any of the blacklisted numbers, the application will return[]so that the call continues.
First, we iterate through the list and compare each of the blacklisted phone numbers to our calling number:
if from_number in blacklisted_numbers:
If the number is in the list, we will send a reject action to the trunk group that looks like the following:
return '[{"action": "reject", "operands": ["unavailable", "aniblock"]}]'
Otherwise, we will return []:
return '[]'
The final code of our application looks the following way:
from flask import Flask, request
import json

app = Flask(__name__)

@app.route('/', methods=['POST'])
def home():
    blacklisted_numbers = ["5162065613","5162065614","5162065615","5162065616"]
    data = request.get_json()
    from_field = data.get('From','')
    for item in from_field:
        from_number = item['user'][-10:]
        if from_number in blacklisted_numbers:
            return '[{"action": "reject", "operands": ["unavailable", "aniblock"]}]'
        else:
            return '[]'
Step 4: Start Flask Server
Now let’s test our application! You can run your local Flask server through terminal using the following command that will serve the created application to the incoming requests.
FLASK_APP=external_handlers.py flask run
Now your application is running, but it is not visible to the outside world. We need to expose the localhost route publicly over the Internet so that your trunk group could access and load the instructions. To do this, we can use the free ngrok tool. If you choose to use ngrok, follow the instructions on their website to download it. Alternatively, you may expose the URL any other way you choose.
Once your Flask server is running, your terminal will list the port it is running on. Expose this port by running the following command through terminal. Make sure to replace 5000 (which is the Flask default port) with the port that your Flask server is running on.
./ngrok http 5000
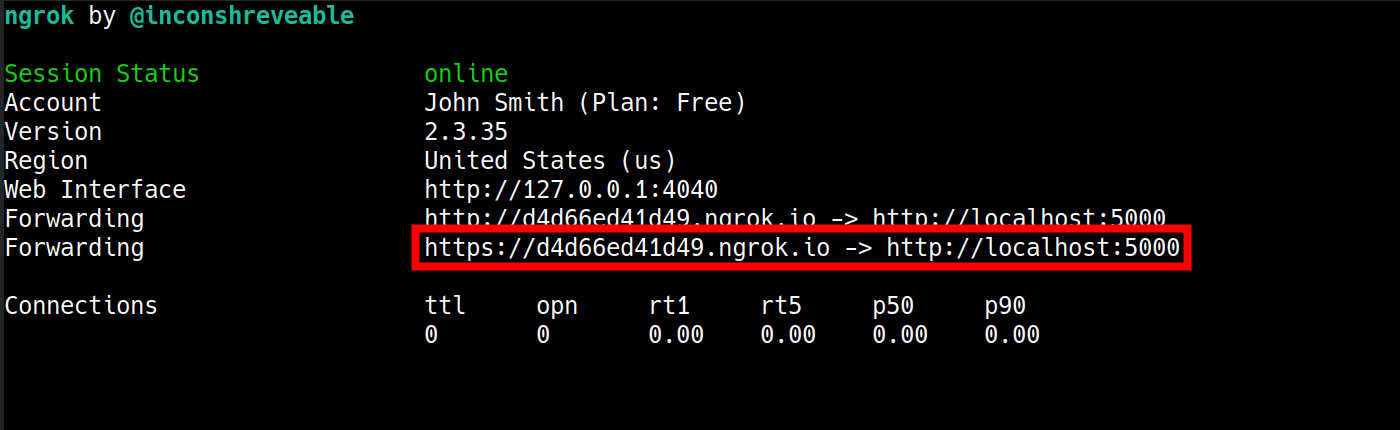
When ngrok is run successfully, it will open a new terminal tab that will show you the http and https URLs that make the application publicly available over the Internet.
Step 5: Add Handler to Trunk Group and Place Call
Add the https ngrok link (in our sample it is https://d4d66ed41d49.ngrok.io/) to the external_handlers of the trunk group where you want this application to work. This is done with the following request:
curl -X PATCH \
'https://api.carrierx.com/core/v2/trunk_groups/c7eae0b4-5eda-4964-8998-d514903b4af0' \
-H 'Content-Type: application/json' \
--data-binary '{"external_handlers": [{"direction": "any","url": "https://d4d66ed41d49.ngrok.io/","timeout": 250,"error_handler": "reject403"}]}' \
-H 'Authorization: Bearer 5ebc03d6-8b2b-44ad-bf65-72d4f1491dda'
Run the application, call the phone number associated with the trunk group where we set the external handler, and see the result. If the phone number is from the blacklist, it should be declined by the handler.
Next Steps
You have created your application that filters out the unwanted calls using the database connected to the trunk group! You can try to write your own handlers, which will use a whitelist (i.e., accept calls from certain numbers only), or use the CNAM value of the From field (that is the name parameter) to either accept the calls only from the callers with certain CNAMs or decline the calls from such callers.
Refer to the following page to learn more about external handlers and their parameters: